
Enjoy Our Blogs Or Suggest A
Topic You Would Like Us To Cover
Blog Posts At Starsound Studios Cleveland
You want to achieve top-quality results in recording, audio mixing, Dolby Atmos mixing, and mastering. Our blog page provides detailed information about our Studio and tutorials on these subjects, such as 'Mastering the Art of Audio Mixing' and 'Recording Techniques for Beginners '.
Our blog posts are not site-specific. You can use these techniques in any studio around the world. The tips help you navigate a studio session, give insight into the studio perspective, and offer tips and tricks for getting the sound you are searching for.
We illustrate pitfalls we have encountered, cutting-edge tools, and rules and guidelines to strictly follow. You get everything between our use of the Dynamount, our Dolby Atmos Mixing Studio, the Synergy and Kemper Amplifier systems, Izotope's Tonal Balance, and Process Audio's Decibel.
Our services include video recording, mixing, and mastering, all available to Cleveland, Ohio, and its surrounding areas. We're not just dedicated to providing the very best, but we're also committed to enhancing and valuing your unique artistry.
Read Our Blogs
How to Record Guitar With A Dynamount X2-R
How to record guitar. We will show you our step by step process of how to record guitar so that you can reproduce those steps at home. Or, you can let us handle the recording for you. Recording guitars start with dialing in the tone of the amplifier in the air. This process is individual to each guitarist. The idea is to get the sound they enjoy while standing in front of the amp and listening.
Once that is achieved, the second step of how to record guitar is getting the headphone mix right. This is an essential step because that is how a guitarist will monitor their playing. It is vital for that part to be done right as the recording will suffer otherwise.
The next component of how to record guitar is making sure that your console monitor speakers are in your mastering stage. All of the plugins and analog gear have to be engaged. If you dial a sound in without this step, engaging it later will alter what you have decided was a good guitar sound. This step is critical. Monitor with a limiter on. We send audio out to a summing box and to outboard gear. That signal chain must be active. It could be detrimental to your recording otherwise.
How to record guitar is the focus of our blog. We will show you our step-by-step process of how to record guitar so that you can reproduce those steps at home. Or, you can let us handle the recording for you. Recording guitars start with dialing in the amplifier's tone in the air. This process is individual to each guitarist. The idea is to get the sound they enjoy while standing in front of the amp and listening.
Once that is achieved, the second step of how to record guitar is getting the headphone mix right. Getting the headphone mix correct is essential because a guitarist will monitor their playing through them. Getting that step correct is vital as the recording will suffer otherwise.
The next component of how to record guitar is making sure that your console monitor speakers are in your mastering stage. All of the plugins and analog gear have to be engaged. If you dial a sound in without this step, engaging it later will alter what you have decided was a good guitar sound. This step is critical. Monitor with a limiter on and engaged on the track. We send audio out to a summing box and other analog outboard gear. That signal chain must be active and could be detrimental to your recording otherwise.
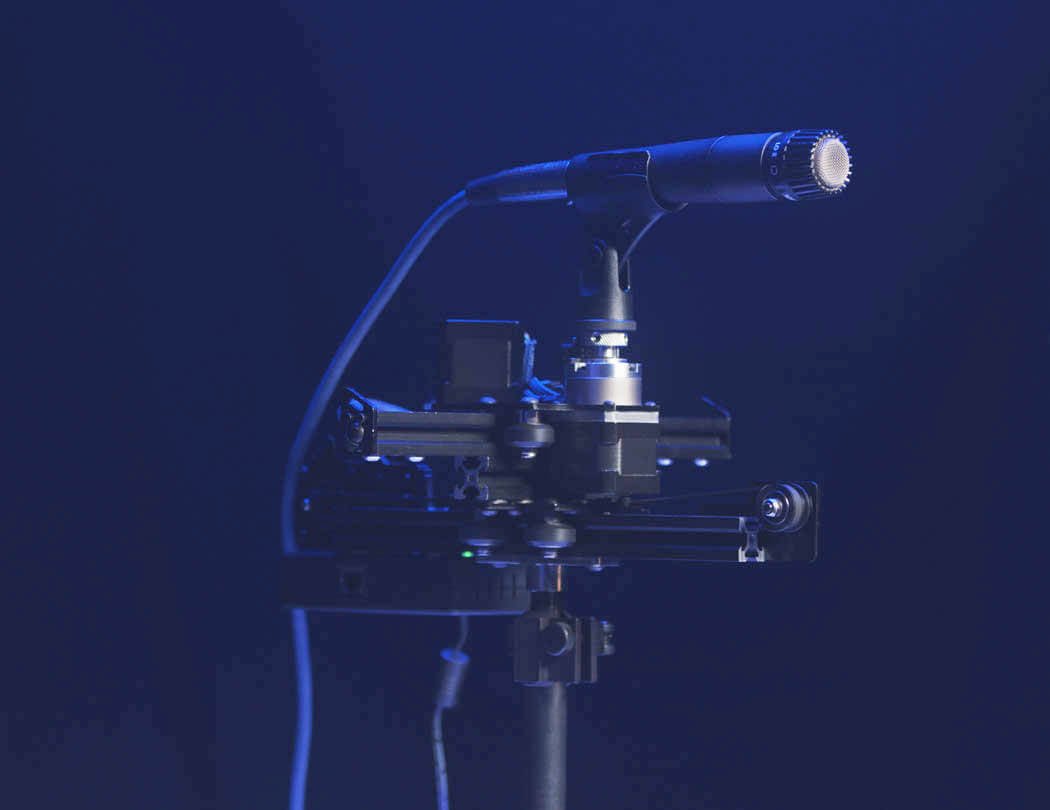
The next step is to get the guitar amp's sound out of your monitor speakers. Getting this sound is the most crucial step, and we use the Dynamount X1-R to achieve it. This step is the foundation of your album sound. Again, we use the Dynamount X1-R to accomplish this step. We sit in the mix triangle with the guitar player standing right behind us. The Dynamount X1-R is a wifi motorized microphone platform. We place it in front of the guitar cabinet, and it moves the microphone as the guitar player is performing in real-time. Pushing the mic toward the speaker's center will give you higher tones. Achieve lower tones by moving the microphone to the edge of the speaker. However, it does not stop there.
Each channel that we record has an analog equalizer and compressor. We use those on the way in to help shape the sound further. This step helps get the music we want out of the monitor speakers even more and helps with the next step we will discuss. We use these steps to record every instrument. Get the sound you want the final album to sound like from the beginning.
Finish these steps with every instrument record the band. Then, a funny thing will happen. Those sounds that you thought were fantastic guitar, bass, keyboard, and drums sounds do not work together. That is where the Dynamount X1-R comes into play again. We need to listen to how the guitar relates to the other guitars to record the guitar. Also, listen to how the bottom of the guitar relates to the bass guitar. If there is a problem with the sound, move the microphone accordingly. Too much interference with the low end of the guitar? Move the mic towards the middle of the speaker, likewise with the bass sound. Get the band to blend with itself. Nobody will have their exact instrument sound, but the sounds will work together for the entire group. That is the ultimate goal. Visit Starsound Studios for more information.
Recording Acoustic Guitars At Starsound Studios
How To Record Acoustic Guitars? If you are not going direct, it is all about mic placement. Place the microphone too close to the soundhole, and you will get more body because of the proximity effect. Set the mic closer to the neck, and you will get more sparkle. You will get more direct acoustic guitar sound and less room the closer the microphone gets to the acoustic guitar. You will get more room sound farther away. What do you do?
How To Record Acoustic Guitars? In comes the Dynamount X1-R. It will allow you to move the microphone along the sound source in real-time while you are in the sweet spot listening to the result. As soon as you find the perfect place, you can save it as a preset and keep experimenting. It is an ideal tool for capturing excellent sound and lets you get the best mic positions.
How to Record Acoustic Guitars? If you're not going direct, the world of mic placement is your oyster. Place the microphone too close to the soundhole, and you'll get a rich, full-bodied sound thanks to the proximity effect. Move the mic closer to the neck, and you'll capture the guitar's sparkling highs. The closer the microphone gets to the acoustic guitar, the more direct the sound and the less room it will have. Move it farther away, and you'll start to capture the unique room sound. The possibilities are endless, what will you discover?
How To Record Acoustic Guitars? In comes the Dynamount X1-R, a versatile tool designed specifically for mic placement in real-time recording. It will allow you to move the microphone along the sound source in real time while you are in the sweet spot listening to the result. You can save it as a preset and keep experimenting when you find the perfect place. It is ideal for capturing excellent sound and lets you get the best mic positions.
Typically, the microphone is positioned at the twelfth fret to capture the strings and the sound hole for the body sound of the acoustic guitar. The Dynamount, however, offers a unique advantage. Placing it at the twelfth fret and then angling the microphone off-axis towards the sound hole provides a versatile recording solution. This setup allows you to capture the best of both worlds. The Dynamount can also be used to adjust the distance from the acoustic guitar. By moving it back and forth, you can observe how the air space between the guitar and the microphone creates a form of compression. Similarly, moving the Dynamount from side to side can be used as a form of EQ. The best part? These adjustments can be made without the need for additional plugins.
When it comes to recording acoustic guitar in our vocal booth, I usually wait until after the band has finished their recording. In the audition phase, I use the Dynamount as a form of EQ and compression. It's not just a tool, it's a mechanical equalizer and compressor. I move the microphone around the acoustic guitar in real time to determine its sound against the rest of the track without the use of compression or EQ. This process, with the Dynamount at its core, ensures that I'm making informed decisions about the sound of the acoustic guitar.
How to Record Bass Guitar In Cleveland At Starsound
How to record bass guitar you ask? Microphone placement is key. We use a Dynamount to robotically move a microphone along the bass cabinet in real time. This enables us to sit in the sweet spot of the speakers and listen to the bass tone while the microphone is moving across the cabinet. Stop when you find the tone you need.
This blog will focus on how to record bass guitar. We will show you our step-by-step process of how to record bass guitar so that you can reproduce those steps at home. Or, you can let us handle the recording for you. Recording bass starts with dialing in the amplifier's tone in the air. This process is individual to each bass guitarist. The idea is to get the sound they enjoy while standing in front of the amp and listening.
Once that is achieved, the second step of how to record bass guitar is getting the headphone mix right. Achieving the right headphone mix is essential because a bass guitarist will monitor their playing through them. Therefore, doing that part is vital as the recording will suffer otherwise.
The next component of how to record bass guitar is making sure that your console monitor speakers are in your mastering stage. All of the plugins and analog gear have to be engaged. If you dial a sound in without this step, engaging it later will alter what you have decided was a good bass sound. This step is critical. Monitor with a limiter on and engaged on the channel. We send audio out to a summing box and outboard gear. That signal chain must be active, which could be detrimental to your recording otherwise.
The next step is to get the sound of the bass amp out of your monitor speakers. Getting the bass sound out of the monitors is the most crucial step, and we use the Dynamount X1-R to achieve it. This step is the foundation of your album sound. Again, we use the Dynamount X1-R to accomplish this step. We sit in the mix triangle with the bass player standing right behind us. The Dynamount X1-R is a wifi motorized microphone platform. We place it in front of the bass cabinet, and it moves the microphone as the bass player is performing in real-time. Pushing the mic toward the speaker's center will give you higher tones. Achieve lower tones by moving the microphone to the edge of the speaker. However, it does not stop there.
Each channel that we record has an analog equalizer and compressor. We use those on the way in to help shape the sound further. Using the analog gear helps get the music we want out of the monitor speakers even more. It also helps with the next step we will discuss. We use these steps to record every instrument. Get the sound you want the final album to sound like from the beginning.
After taking these steps, with every instrument, record the band. A funny thing will happen. Those sounds that you thought were fantastic guitar, bass, keyboard, and drums sounds do not work together. That is where the Dynamount X1-R comes into play again. To record the bass guitar, we need to listen to how the bass guitar relates to the kick. Also, how it relates to the bottom of the guitar parts. If there is a problem with the sound, move the microphone accordingly. Too much interference with the low end of the kick? Move the mic towards the middle of the speaker, likewise with the guitar sound. Get the band to blend with itself. Nobody will have their exact instrument sound, but the sounds will work together for the entire group. That is the ultimate goal. Visit Starsound Studios for more information.
Audio Mixing In Cleveland Ohio At Starsound
Audio mixing services from Starsound Studios provide you with the utmost quality and care. We take your audio files and provide you with the best audio mixing services. It does not matter if you are actually in Cleveland, Ohio, or another state. For that matter, audio services Cleve. OH can mix stems you send us from anywhere in the world.
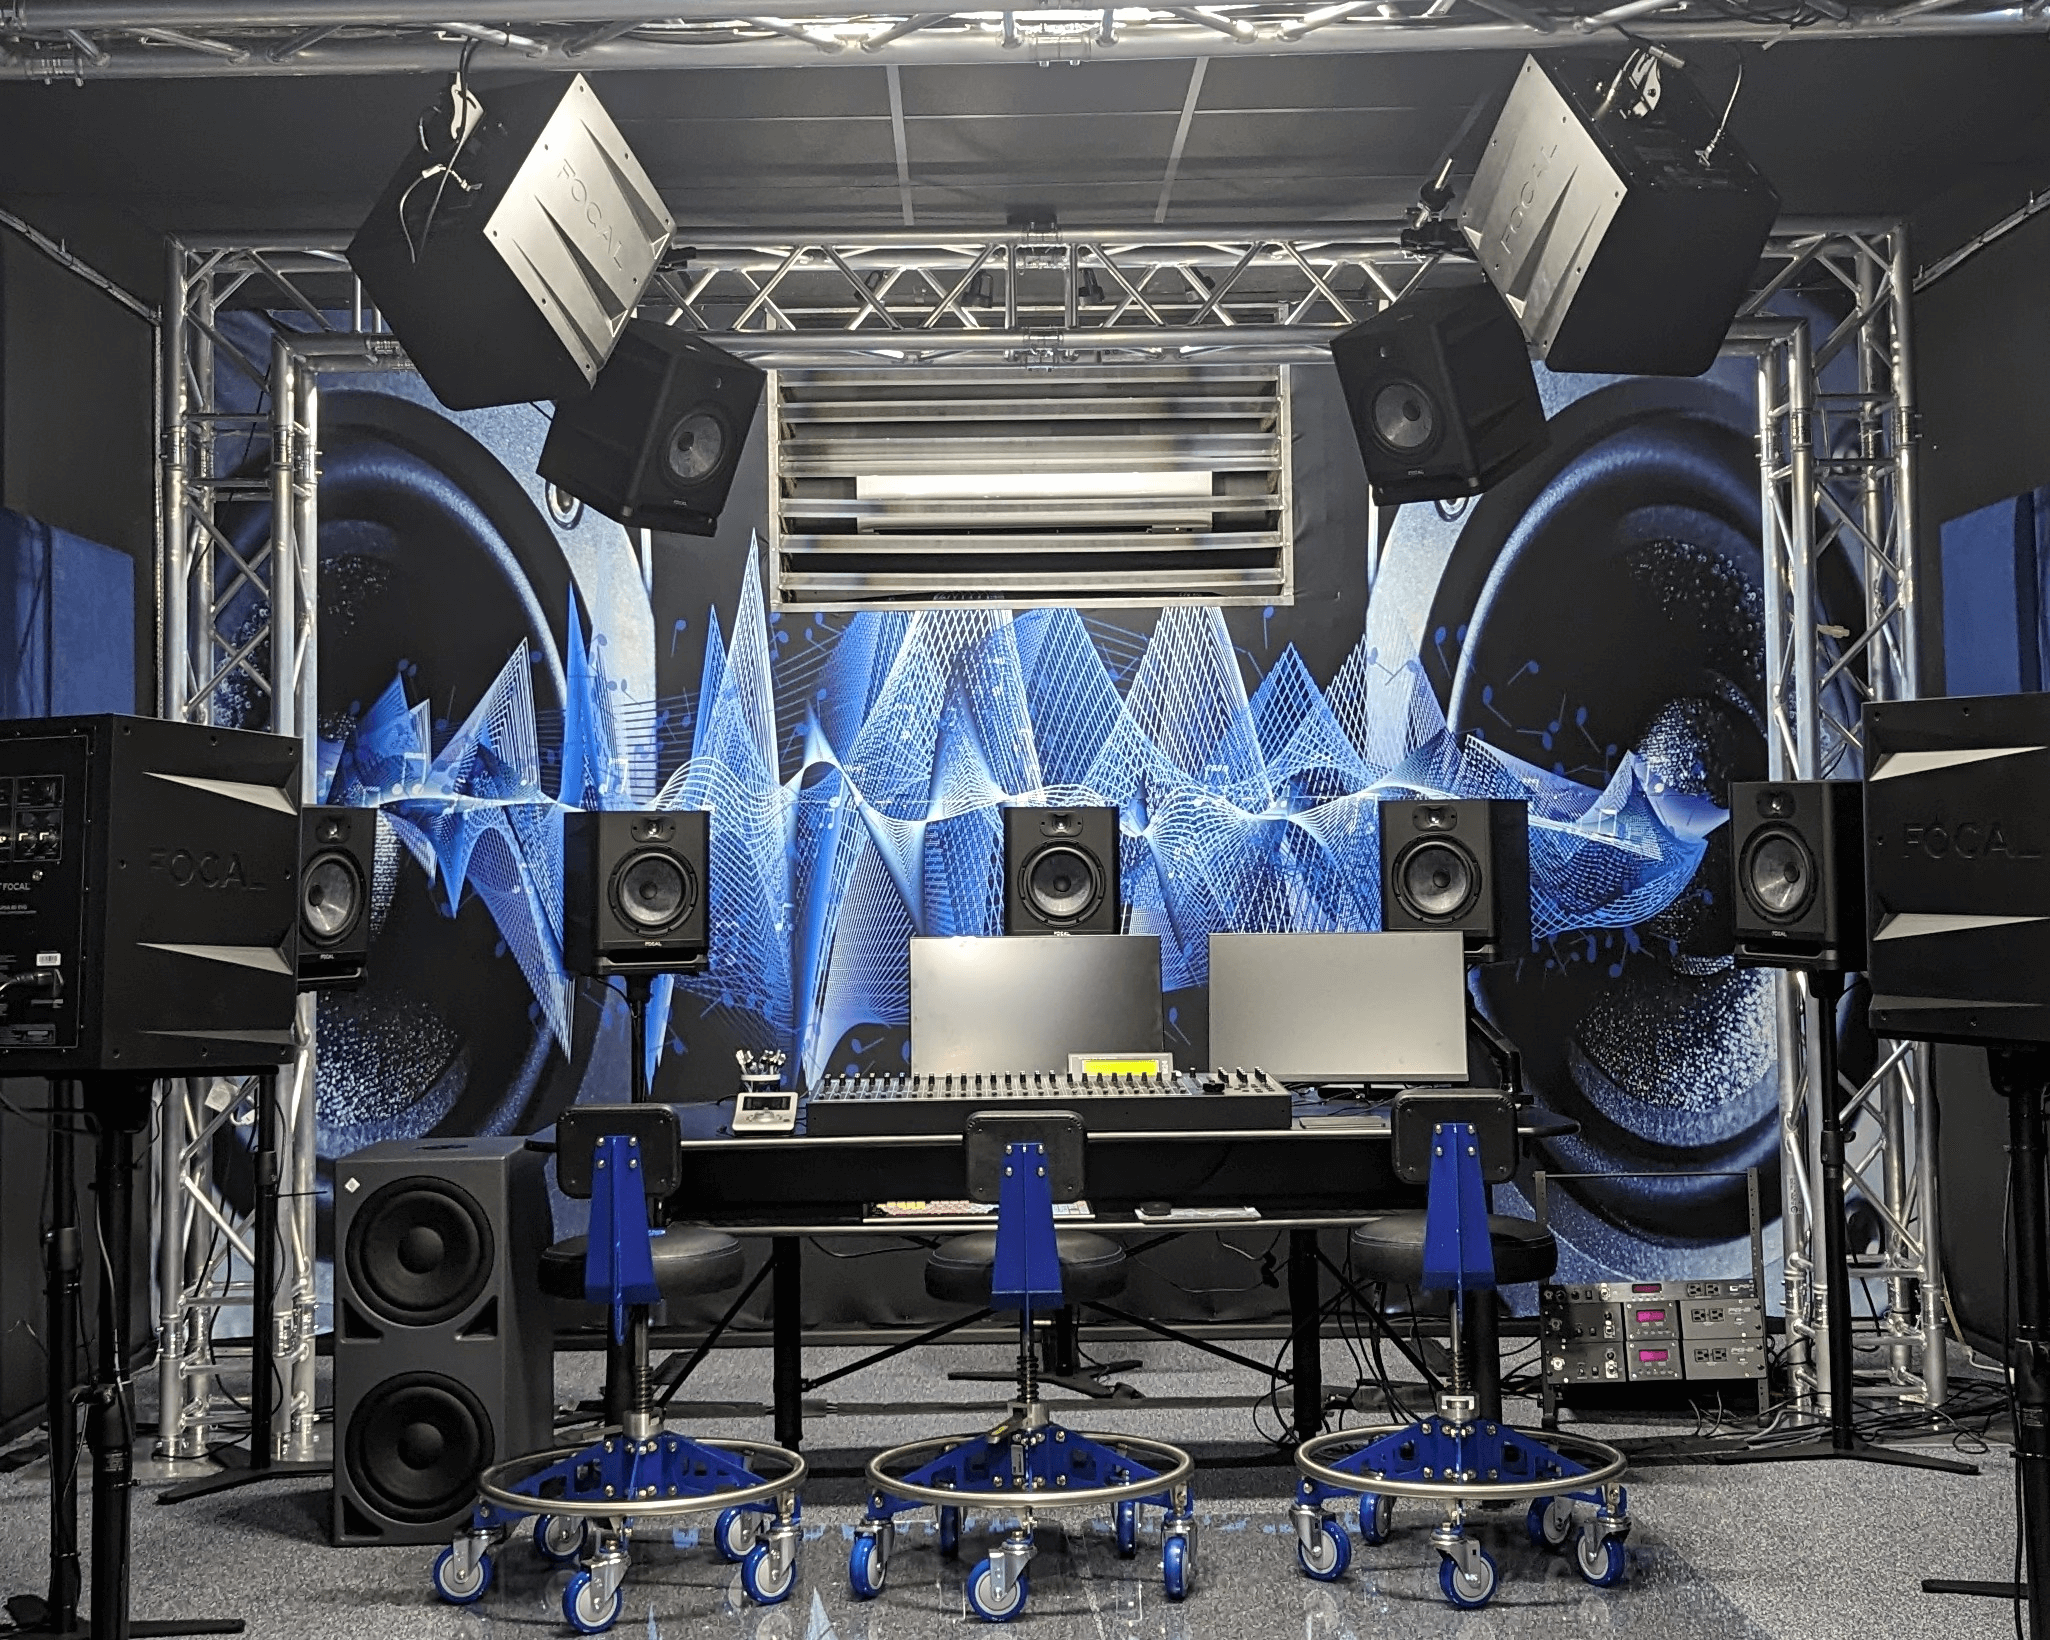
We are using our flagship Studio A, Audio mixing services Cleve. Ohio will provide the highest quality. It provides an analog-digital hybrid system that adds analog weight to your song. Also, it means that we are retaining all of the advantages and ease of use that digital audio products provide. It is truly the best of both worlds.
We will be sending the audio back to you via google drive. Audio mixing services Cleve. OH sends an invitation to download your WAV, MP-3, or both. You will have a professional-sounding mix of industry-standard delivery. An expert mix will stand up to the recordings that you hear on the radio. Get a competitive radio mix done correctly here at Starsound Studios for a fair price. Also, getting one of our many other services to help promote your project and get found on the internet is even better.
I adhere to the LUFS standard needed to make your mix radio-ready. I also use Izotope’s Tonal Balance. This plugin will show you the EQ curves of multiple genres of music. I then run your mix through its plugin to determine if the song I am mixing fits their EQ curve. When I achieve the LUFS standard and the song lands inside the EQ curve set by the genre of music, your song will stand up to the radio music you like. To make the song loud, we use Nova Clip. It lops off the top transient to achieve a louder result. These steps ensure that our mixes stand up against the chart-topping hits.

Recording Drums Cleveland Ohio At Starsound
Recording Drums Cleveland, Ohio. We have developed a system to help us record drums. There are several steps to get a great drum sound. We will walk you through it step by step so that you can try and recreate it at home. Or come to Starsound, where we have your back.
First, when recording drums Cleveland, Ohio, you have to tune all of your drums to a specific tension. It needs to be the same for each drum. The same pressure means you are letting the drum body itself determine the sound. We tune our drums to 70psi for every lug, and the result is 75 in the middle of the head when finished. Crossing the lugs the same way you tighten your tire on to the car is the key. Do this the same for the top head and bottom head of your drums.
Secondly, put a few cotton balls into each drum. This should be done before you tighten the head down. The purpose of the cotton is to deaden the decay of the drum. Soon as you hit the batter head, the cotton balls fly into the air and land back down on the resonant head. The cotton balls hitting the resonant head reduces the amount of ring the drum produces. This is great for a recording. It means less editing when a drum quickly decays.
When recording drums, we adjust the level of the drum microphones by turning up or down the preamp. The preamp flows into ProTools through its converters, which are set to -18dB. That level is where the converters are aligned to analog zero. This way, our gain staging is set to hit analog gear immediately. We put a plugin with a meter inside and set that level accordingly. This is a big step when using any outboard analog gear. You will want to check your interface to see what it is aligned to and use that number from the user manual.
Next, have the band play together when recording drums Cleveland, Ohio. Listen to the bass guitar and kick drum relationship. Make sure there is no masking of frequencies. If the kick is the lowest element in the song, adjust the bass guitar sound by applying a high pass filter to the desired equalizer frequency. Reverse that process if the bass is carrying the bottom of the song. When you are confident that the drums sit well with the rest of the music, you are ready to go. Until next time!
Recording Guitar Dynamount At Starsound Studios
We have been developing a five-step approach when recording guitars with Dynamount to get a great tone in a recording. The secret is to capture your guitar tone out of your monitor speakers. The only way to accomplish this is with a Dynamount. It allows you to move the microphone along the guitar cabinet in real-time while sitting in the sweet spot between your monitor speakers. Here are the five steps.
First, get the guitar sound that you or your client wants in the room. In our video, recording guitars with a Dynamount below, the guitarist had a foot pedal that they wanted to use. We integrate it into our process quickly and easily. He continues to play until we dial in the sound he likes to hear in the air. We constantly fiddle with the pedal and controls on the amp to taste. This process takes time and effort. That is step one.
Secondly, we get a headphone experience that the guitarist likes when recording guitars with a Dynamount. This step is tricky because guitarists do not spend a ton of time listening to their guitar through headphones. Usually, it is a four twelve cabinet on stun! Moving to headphones is a different experience. We have a multiple-channel headphone rig with equalizers onboard to combat this issue. Tweak this system until they are at least a little more comfortable. That is step two.
Thirdly, we use a meter to ensure the proper signal level coming into our converters. Since the converters that we use calibrate to -18dB, we ensure the meter sets to this level. We achieve this by using the seven-band EQ that comes standard with ProTools. It occupies the first plugin spot. While it is open, have the guitarist play and watch the meter. There is a line that is -16dB within the plugin. Use that level to set your incoming signal. The converter can handle a couple of dB tolerance. Turn up or down your preamp level until you achieve this level. This step is the most important. You cannot clip the converter. Take great care in this step. That completes step three.
Next, we dial in the sound with a Dynamount. We have three for both our guitar rigs and the bass rig. Once the Dynamount calibrates itself, move the microphone along the speaker cabinet until you achieve the album sound you are looking to meet. This process is painstaking. All of this takes time, energy, and patience. It is also why we have a ten-hour minimum in all of our studios. This step is the most important one, as it is your final guitar tone to be recorded.
Finally, record the take. Make sure that the playing is consistent and on timing when recording guitars with a Dynamount. Get the audio take as close to perfect as you can. Re-record over and over if necessary. The idea of fixing mistakes in the mix is a myth. You only make it less miserable. If there is something you are not happy with, always re-record. Editing takes much longer than a retake. Visit Starsound Studios for more information. Until next time!
Recording Bass Guitar At Starsound Studios
Recording bass guitar at Starsound Studios is a process. We use a four-step method when recording bass guitar.
First, the player must be comfortable with their sound. So we dial in the music coming to their headphones. The Behringer personal headphone mixer allows us to bring 16 channels, so mixing is a breeze. Choose the mixing board channel, turn it up or down, and proceed in that fashion until you get what you need to lay down a good take.
The second step to recording bass guitar is making sure the incoming signal into our DAW is in the sweet spot of the A/D converters. Insert a seven-band EQ on each bass channel and check the meter within the EQ to make sure it reads -16Db. Our ProTools converters align to -18Db. But they are tolerant by a few Db. The EQ provides a meter with a -16 setting, perfect for this step. Once the incoming signal is where we like it, the EQ is no longer needed.
The third step in recording bass guitar is using the Dynamount Remote Microphone Mount to dial in the amplifier sound coming out of the monitor speakers. Move it toward the cone to get a higher frequency response. Move it toward the outside edge of the speaker for a lower tone. We also have a stationary microphone on the tweeter of the bass cabinet to catch the snap of the strings. The blend between the two will end up being the bass sound.
Finally, the band will record together. Have the band record only a portion like a verse, middle, and chorus. Listen to the recording to evaluate where the problems lie. For example, with recording bass guitar, the problem lies in the relationship with the kick drum. Once you choose which one you want to be at the very bottom of the song, go back to step three and tweak the setting on the Dynamount. This procedure will either raise the EQ of the bass or lower it, depending upon your preference. Now re-record the same verse, middle, chorus to see if that fixes the problems. If it does, you are ready to record for real. If not, go back to step three. Keep working on the sound before recording it for real.
Here are our final thoughts when recording bass guitar in the studio. Step three is enormous. You will repeat that step multiple times. What you want is a finalized record sound before laying a track down. Taking the most care during this step is critical. There is no such thing as fixing it in the mix. You only make it less miserable. Until next time!

Recording Hip Hop Rap Music At Starsound Studios
Recording Hip Hop - Rap Music Cleveland, Ohio, is a blog post on how to prepare for a recording session. Every artist that inquires about our studio wants only a few hours of recording time and brings an MP-3 to record to. This is a huge mistake. An experienced engineer needs at least 3 to 4 hours to mix and master a song that you can compare to your favorite radio artist.
So if you ask for two hours, that isn’t enough time for the engineer, let alone actually recording your parts. Also, an MP-3 is the worst quality audio there is. An algorithm reduces the WAV file by more than half. You really don’t want to record over that. Your vocal frequency was not a consideration when making the song. That is a huge downfall. It is a generic beat that the people who make beats are hoping to sell. You like it. Now you pick the WAV or god forbid, the MP-3. Changing the song is impossible.
Recording Hip Hop - Rap Music Cleveland, Ohio, is here to the rescue! Always pick the track out. I know it is more expensive, but it will be worth it to you in the long run. Remember, the song was not mixed with you in mind. Now that you have the track out – it can be. Now you can have a custom mixed song with your vocals in mind. Nothing in the way of your voice. That cannot be accomplished with a WAV or MP-3.
Recording Hip Hop - Rap Music Cleveland, Ohio is a blog post from Starsound Studios. We know what to do to help you achieve the sound you are looking for. Give us a call, and we will deliver the sound quality you desire. Book your Hip Hop - Rap Music Cleveland Ohio time today.
Recording Studio Near Me: Cleveland, Ohio

Recording Studio Near Me is a search term used when searching for a recording studio, but what studio will be the right choice for you? Of course, that is the million-dollar question. We will guide you on choosing the proper studio for you when searching for a recording studio near you.
First, you must find the right audio engineer to give you what you are looking for how your song will sound. Then, ask for a tour and to hear examples of their work. You may not like the songs they play. That does not matter. Listen to the mix itself. Does it have all of the nuances of how you want your project to sound? If the answer is yes, that's the studio for you.
How comfortable is the studio?
Every recording studio provides water, bathrooms, couches, a break room, and the like, but how satisfied are you with the knowledge and expertise of the sound engineer? Is the studio environment inviting, and how about the layout? Can you see yourself recording in that environment? If the answer is yes, it's probably the studio for you. Is there a clear mutual vision of how to capture your project? A recording is not a spur-of-the-moment activity, and it takes planning and effort to complete. Does the audio engineer provide a clear vision and ask you questions to mark that path? If the answer is yes, it's probably the studio for you.
How Much Does it Cost?
Lastly, did you notice that I did not talk about cost? It does not matter how much it costs if you have found the proper studio to execute your vision. If you go to the cheapest studio and fail to get the result, what is the point in that? So the next time you type in the search "recording studio near me," remember these few points and see how the person on the other line handles the conversation. It will honestly speak volumes.
By the way, the "Recording studio near me" search term only shows you who is closest to your phone or home computer, and it doesn't mean they have the right plan for you and your project. Until next time!

Communication: Prepare For A Recording Session | Studio 101
Communication between a recording studio and its clients is vital. Discussing everything about the project before the recording starts is paramount. We put together this series to help the recording session run as smoothly as possible. Each of our videos fits together and overlap. Communication is the glue that brings all of these suggestions together. A Client's understanding of the recording process and why a studio engineer is making suggestions is essential. A studio engineer needs guidance from the client to help get the entire process finished on time. Also, they need that guidance to give you what you came to the studio for in the first place. A discussion over this whole process is the communication we are referring to.

Communication starts with how long it will take and how much it will cost for that time. We feel ten hours a song is what it should take. It takes into account several things. The first is a two-hour setup time that includes every instrument's microphone level settings on the pre-amps. It is also taking into account the converters of the interface. Listening to every instrument part playing together as a group is very important. Sometimes there is a masking of frequencies between musical instruments. Keep in mind that there is no such thing as fixing it in the mix. Recording correctly needs to be done from the very beginning. Taking this step ensures the song will come out the way it should.
Secondly is the time it takes to mix and master a song. This step depends upon the individual audio engineer. I average three to four hours when mixing and mastering songs. Mixing depends upon the original recording. So if taking care at that point, mixing and mastering can be less of a mess.
What Else Is Involved With Communication?
Communication with the studio is also about how much editing you require. We suggest playing to a click track. Playing to a click track means there will be less editing. On average, spending two hours on editing is standard. Editing is more for songs that artists send to me to mix and master.
The third step is recording the group. This step is the least predictable time frame. How much preparation a client does before coming to the studio is unknown. The fact that we are doing this series will tell you that there is a need for preparing. Our intention is not to be disrespectful. How can you know what you don't know? That is why we are doing this series. Helping someone when entering any recording environment, home, or commercial is enormous. Three hours is the average here in our studios.
The communication between the studio and their clients will reveal every aspect of how long it will take to get your project done. That can be a moving target, which also needs discussion. Nothing ever runs entirely the way the planning happens. However, if a plan takes place, there will be an understanding of if hang-ups may happen. In my estimation, it will take ten hours per song. Some have gone quicker and others longer. The average has been ten hours. That is why we have a ten-hour minimum in our studios.
Communication is key. Do not be afraid of asking questions and getting clarification. If a studio has an issue with that, move on to a different one. Better yet, give us a call. Communication is standard practice here.

Have Examples: Prepare For A Recording Session | Studio 101
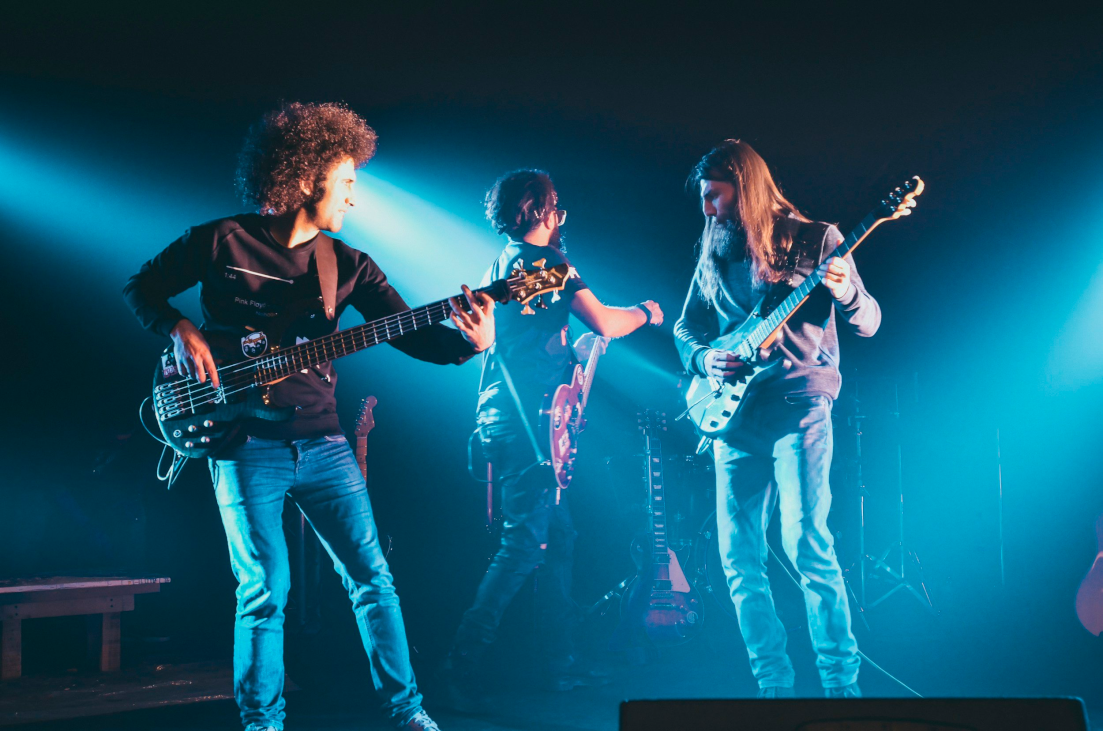
Have examples. I know you are an original band. However, you have influences and bands you respect and want to emulate their sound. Your original material makes it different. But you can go after a tone or feel of a group you like. For example, let's say you are a metal band. You sound nothing like Metallica. However, you want the power and tone of the song Enter Sandman. Your song is nothing like it, but you respect the sound. So how do you do that? We are happy you asked.
Have examples and bring them to the initial meeting with your studio or the first session. Have the engineer listen to the song. This way, as you are getting set up and setting sounds, the engineer can follow the example. The engineer can pay attention to the tone and help you tweak your sounds to capture the sound of the band you are trying to emulate on the CD example.
I Have Examples - So How Does That Help?
ProTools, as well as most DAW's, have an input monitor button. The button allows you to listen to what is coming into ProTools. Put the example you brought to the studio on the master track. Now you can toggle the button on and off. When the switch is on, you are listening to the band. When it is off, you hear the example. The songs are different, but you can achieve the same tone and power.
If you have examples, you help the engineer accomplish what you want from the recording. If you come in saying make it browner, that statement is up for interpretation. Also, that would be a very long conversation. If you have examples, the dialogue and outcome are entirely different and very much so for the better.
Practice Correctly | Prepare For A Recording | Studio 101
Practice Correctly? What do you mean? We have done several video tutorials and blog posts on this topic and plan future ones. One way to practice correctly is to practice in the environment you are entering. Do you know those Iron Man competitions where the athletes swim five miles, bike ten, and run a marathon? They have to swim in the ocean for five miles. You would not practice in a flat, calm pool heated like bathwater. The environment that you are entering is cold and wavy. Same with entering a recording studio. If you are recording with headphones, practice with headphones. Get used to how they sound. Get comfortable with them on your head for long periods.
Another way to practice correctly is by using a click track or metronome. Using a click track will keep the group tight and your recording tighter. Thirdly would be to record yourself at home. Listen to how you sound. That sound won't change because you are at a recording studio. Keep adjusting yourself at home to blend the music of your group. When you enter a recording studio, you already have a good idea of how it will sound, not just hoping it will.
What Do I Do Now to Practice Correctly?
Lastly, I equate practice correctly to a hitter in baseball. You go to the batting cage an hour a day, seven days a week, and have a hitch in your swing. Then you keep practicing with that hitch, not realizing it, and are practicing the wrong way. Now you get in a game and wonder why you still don't make contact with the ball repeating over and over that you are practicing every day. If you practice wrong, it won't translate to the field. Same with entering a recording studio. You certainly do not want to practice the wrong way and play with a hitch in your instrument.
It would be best to listen to your recordings at home for consistent playing, timing, and dynamics. If you're playing is all over the road, the sound of your studio record follows suit. Practicing is not just time spent noodling your favorite tune; it is playing and dissecting the performance, repeating the right things, and eliminating mistakes. Your recording will thank you.

It Takes Time | Prepare For A Recording Session | Studio 101
It takes time—way more time than you think. I have clients call the studio all the time, looking for 3 hours. National touring artists do not go into the studio, and 3 hours have the hit you hear on the radio. Here are the facts. Whatever your estimate is, multiply it by three.
First, there must be some session set up. All the recording instruments must be set up, tuned, and miced up. Instrument sounds keep getting adjusted accordingly to the song. The engineer must adjust the pre-amps for all of the instrumentation. So for argument's sake, let us say that it takes two hours. Secondly, all of the trackings, overdubbing, and recording of the song must occur. Let us say that it takes two hours. Next comes editing. You want your song's timing perfected, do you not? Of course. That will take another hour or two. It takes time.
It Takes Time. How Long Is This Going To Take?
It takes time. Now the engineer must mix and master the song. The song must be radio-competitive. So the time it takes an engineer to mix and master a song can vary. It takes me from importing raw files, or after a band records their music, about three or four hours if I am uninterrupted. So it may be in your best interest to let the engineer mix and master the song by himself. So you see that it takes time—more than the initial call of three hours. I stated earlier to multiply that initial ask by three. The total would be nine hours, three hours times three.
Now we add my estimations. Two hours set up plus recording for two hours is four hours. Add that four hours to the editing, bringing our total to six hours. Lastly, add the engineers three to four hours to mix and master, and you have 9 hours at the minimum. That amount of time is the initial three hours asked for times three. It takes time. At Starsound Studios, we have a ten-hour minimum in all of our studios for this reason.

No Place For Creativity: Prepare For Recording: Studio 101
No Place For Creativity? What do you mean? We are so glad you asked. If you are spending your money on an expensive recording, you want it to come out right, don't you? So it would help if you came into a commercial recording studio after super preparation at home. It is no place for creativity.
You want to be able to play the song so well that if you fell in the parking lot entering the building, you can crawl in bleeding and head aching and still play it like a champion. Think about that statement and what it means to you. How long would you have to practice to do that? It means a whole lot of practice and effort to play flawlessly to me. If you come to a studio after preparing like that, it will sound like it. If you go to the studio to be creative and wing it, the listener will hear it had no plan. I realize this takes all of the fun out of playing, and you think it is boring. However, your record won't sound boring. You can count on it.
If The Studio Is No Place For Creativity, Now What?
If you are going into the studio to record a song, play only that song for weeks prior. Then go into the studio. I know it isn't enjoyable. The recording lasts forever. Make that moment stand out! The studio is no place for creativity. The creativity happens at home, not in the studio. You are at the studio to work a plan, not make things up out of thin air.
The studio is no place for creativity. You can make time in your studio budget for experimenting. After accomplishing the goal, the band should do your experimentation, and the track and the tracking go well. Schedule Twelve hours. Work your plan in the first ten. Get the recording, mixing, and mastering perfect. Now use the last two hours for experimentation. Maybe you catch lightning in a bottle. Going into the studio, hoping to find electricity, only gets you burned! Now, do you see that the recording studio is no place for creativity? The creativity is in working out the song at home.
Record Yourself | Prepare For A Recording | Studio 101

Record Yourself? I know that is why you are coming to the studio. So what gives? We are happy you asked. Record yourself on your cell phone. Put your phone at the other end of the room and record the group or yourself. Evaluate that sound, energy, and performance. Think about how good it will sound at the studio if you can make that sound pretty good.
Make adjustments. Turn things down. Listen to each other musically to help make the phone recording sound good. Please don't make it about ego. If you are too loud on the phone, you most likely are too loud everywhere you play. This kind of evaluation can be nerve-racking. However, it can also be a fantastic tool to further your band's live sound as well.
Record Yourself To Know What You Sound Like
Record yourself so you will already know what an audio engineer at a commercial recording studio might suggest for you to do. For example, the engineer might recommend turning up or down. They also might ask you to change the sound of your instrument so it blends better with the whole band. Capture what you want to sound like from the beginning. That is the engineer's job. The engineer is not on anyone's side. They are on the side of what volume level seems good coming out of the control room speakers. Isn't that what you should be a fan of also? Make it easy on them by already knowing what you sound like beforehand.
Record yourself and evaluate the result with no ego or agenda other than the betterment of the band. The recording studio session will be what you want to hear out of the recording. It will sound good because the playing and the blending of the talent will be as well.

Headphones - Prepare for a Recording Session | Studio 101
Headphones. How To Prepare For A Studio Recording Session Studio 101. Are you going into a recording studio or need help at home? How to prepare for a studio recording session is your solution. I hear from clients in my studio that they cannot hear very well while playing with headphones. That is not the truth. They are just not used to how their instrument sounds in a headphone. This problem happens because of the way they practice. Let's use a guitar player as an example. A guitarist has ten or twelve-inch speakers in their rig and up to eight speakers in a full-stack. The earth trembles and the house shakes. Life is fantastic!
Now you enter a studio. They hand you a headphone with a three-inch speaker in them. You were practicing with eight twelve-inch speakers. Do you see the problem now? You have to practice in the environment you are entering. A studio does not have the earth trembling and the house shaking.
Headphones. A problem? What is the solution?
Practice with headphones. Most amps have a feature on them to listen with headphones. I know it is not sexy. However, it will be helpful. There are distributors to have multiple headphones plugged in at once if you are a band. Now you have to blend that by turning down and listening to one another. You will get used to hearing your part in a smaller, more reduced fashion. When you are entirely comfortable, now book your studio time.
Most studios have multiple channel mixers that you plug headphones into for listening. Now you have various channels to bring up or down in your headphones instead of just one send at home. Instead of saying you can't hear yourself, you will be saying it is fantastic! Your recording will reflect that.

Inst. Maintenance: Prepare For a Recording: Studio 101
Instrument Maintenance isn't the sexiest topic. But, you know when you will go into a recording session. The planning is usually in advance. Instrument maintenance should be just as essential as the song you are recording. It is a time killer in the studio. The list can include, but not be limited to, guitar strings, bass strings, jacks on the guitars, instrument cables, drum hardware, drum nuts & bolts, drum heads, tuning, and more. Let's look at them one at a time because it is that important.
Instrument maintenance on guitars. You must have the intonation on your guitar or bass evaluated. Or do it yourself if you have the know-how. The main tuning may be correct, but other guitar or bass neck places may not be in tune. Instrument tuning is critical for a recording. Strings are another vital part of the sound of your instrument. Change them. Not at the studio, but days before going to the studio. Give them and your guitar a chance to settle in.
Instrument Maintenance - What is Next?
The subsequent adjustment should be tightening the input jacks. Nothing kills a take more than your instrument dropping out when you move. Also, check your cables. The improper signal can degrade your sound. Instrument maintenance can save your recording.
Instrument maintenance on drums. You don't notice little rattles until placing thirteen microphones on a drum kit. Then, go over every nut and bolt to ensure there are no rattles. That is an extreme time killer in the studio, and tracking it down is problematic because it is not always apparent which drum is causing the issue.
Just like guitar strings, change your drum heads. If you tend to play in a particular key, tune your kick, snare, and toms to notes within that key. That will help bring an extra dimension to the sound of the band. We all think to tune guitar but rarely think of the tone of drums. Just taking that spare time to tune, plus lube all the nuts and bolts, will help.
Instrument maintenance is instrumental in your success in the recording studio. I couldn't resist!

Click Track | Prepare For Recording Session | Studio 101
Use A Click Track. How to prepare for a recording session. Are you going into a recording studio or need help at home? A click track is your solution. Most musicians entering a recording studio request not to have a click track. However, they still want their song edited. These do not go together. The problem is simple. No lines on graph paper.
Take yourself back to middle school math. The teacher asks you to plot the coordinates (5,12). Easy, count over on the X-axis 5 graph lines and up the Y-axis 12 graph lines. Now do the same thing with no lines on the graph paper. That task is impossible. There is no reference to making a graph. Yet, that is what you are asking an audio engineer to try to do. They cannot move the already tracked instruments forward or backward in time with no reference point to guide them. We are here to help you solve that problem.
Solution To The Dreaded Click Track Problem
Get an app for your smartphone that has a click track function. Play your song to beats per minute set on the app. The beats per minute are also known as BPM. Keep changing the BPM on the app until it feels comfortable to stay with while you are playing. Practice to that BPM until it is down pat. If you are in a band, give that BPM tempo to everyone else to practice on their own. Now get together and keep time with that BPM during practice. Keep making adjustments until everyone is comfortable. When you follow that pace repeatedly without fail, you are ready to go in and record.
Go to the studio session and tell the engineer to set the click track to your specific BPM. Watch their face light up. Ah, lines on the graph paper!
How To Record Acoustic Guitar: Acoustic Guitar Mic Placement
How To Record Acoustic Guitar? If you are not going direct, it is all about mic placement. Place the microphone too close to the soundhole, and you will get more body because of the proximity effect. Set the mic closer to the neck, and you will get more sparkle. You will get a more direct acoustic guitar sound and less room the closer the microphone gets to the acoustic guitar. You will get more room sound farther away. What do you do?
How To Record Acoustic Guitar? In comes the Dynamount X2-R. It will allow you to move the microphone along the sound source in real-time while you are in the sweet spot listening to the result. You can save it as a preset and keep experimenting as soon as you find the perfect place. It is an ideal tool for capturing excellent sound and lets you get the best mic positions.
Get Perfect Mic Placement With The Dynamount X2-R
Which would be more productive, a less expensive microphone placed perfectly, or a very expensive microphone placed in the wrong spot? I submit that it is the former and not the latter. Mic placement is everything, and there is no such thing as fixing it in the mix. It only makes it less miserable. Capture the sound you want right away, and your recordings will always sound better. How To Record Acoustic Guitar? Microphone placement is the answer and key. Using the Dynamount X2-R is the way to do it efficiently and effortlessly.
The Dynamount X2-R is how to record acoustic guitar. With its ability to move the microphone around in three ways, you will be able to find the perfect spot on your sound source. The sound source today is an acoustic guitar. But, it can be any source. Click the link provided in the video or at the end of our blog and get your very own Dynamount X1-R today.

Mastering With The Black Box At Starsound
We are focusing our Blog post is on Mastering with the Black Box (HG-2). The Black Box (HG-2) adds weight and dimension to a mix by adding harmonic distortion. So if you are looking for that warmth and depth to your mix, the Black Box Analog (HG-2) is your answer.
The unique signal path is how mastering the Black Box (HG-2) gives the mix analog goodness:
The audio hits the input transformer.
It can move in 2 directions to the Pentode tube circuit and the Parallel Saturation tube circuit back to the Pentode. This circuit will enable us to add parallel compression.
It moves to the Triode tube circuit and hits the passive output attenuator.
It reaches the output transformer.
The features do not end there. It has a Saturation Frequency selector. The frequency selector allows you to manipulate the frequency of the material. In flat mode, it affects the entire signal. The low position changes the low-end sound of the content, and the same with the high position switch touching just the highs.
Mastering with the Black Box Analog (HG-2) also gives you an air boost and alt. tubes. The “air” boost is a gentle high-frequency lift that starts at 10khz and gently rises to 20kHz—the boost inserts in the main signal path at the Triode gain stage. The “Alt tube” selector lets you choose between two sets of 12AX7 tubes in the parallel saturation mode. The “alt” tube is a little more aggressive. The alt. path gives you a full range of tones and saturation types.
Mastering With The Black Box (HG-2) And Its Power
The power of mastering the Black Box (HG-2) is in the way it transforms your mix into a radio-worthy product without having to be a rocket scientist to use it. Using the Black Box at Starsound Studios is the last stop in our mastering chain. We have put it through its paces to find the perfect setting to create the sound of our studio. Then, use it in many different ways. We highly recommend mastering using the Black Box (HG-2) to upgrade your master recordings to a whole new place.