
Enjoy Our Blogs Or Suggest A
Topic You Would Like Us To Cover
Blog Posts At Starsound Studios Cleveland
You want to achieve top-quality results in recording, audio mixing, Dolby Atmos mixing, and mastering. Our blog page provides detailed information about our Studio and tutorials on these subjects, such as 'Mastering the Art of Audio Mixing' and 'Recording Techniques for Beginners '.
Our blog posts are not site-specific. You can use these techniques in any studio around the world. The tips help you navigate a studio session, give insight into the studio perspective, and offer tips and tricks for getting the sound you are searching for.
We illustrate pitfalls we have encountered, cutting-edge tools, and rules and guidelines to strictly follow. You get everything between our use of the Dynamount, our Dolby Atmos Mixing Studio, the Synergy and Kemper Amplifier systems, Izotope's Tonal Balance, and Process Audio's Decibel.
Our services include video recording, mixing, and mastering, all available to Cleveland, Ohio, and its surrounding areas. We're not just dedicated to providing the very best, but we're also committed to enhancing and valuing your unique artistry.
Read Our Blogs
Dolby Atmos: Hire An Engineer | Pro Immersive Mixing Studio
Are you looking to hire a professional Dolby Atmos audio engineer? What do you look for? We will break down the essential elements of hiring an immersive audio mix studio. When hiring a Dolby mixing engineer, three things are crucial: their training, ability to meet requirements, and most importantly, their commitment to high delivery standards.
First and foremost, it's essential to consider the training of the Dolby Atmos mix engineer. Dolby Atmos is a cutting-edge mixing platform with its unique set of challenges. Does the engineer have visible certificates of ongoing training? More importantly, can they meet your specific requirements for your music? Will they bring a fresh, unique approach or rely on a old standards?
Next is meeting requirements. A Dolby Atmos immersive audio mix studio must meet Dolby’s strict loudness and equalization requirements. The conditions mean that not every type of speaker can be loud enough to meet these requirements.
There is also the Dolby curve, an equalization standard for this platform. A professional mix studio must apply this to every speaker in the Atmos environment. It must meet the loudness and equalization curve or face rejection. Can an audio mix studio get away with not meeting these requirements? Maybe. A professional Dolby Atmos mixing engineer will be able to meet these requirements.
Lastly, and most importantly, is delivery standards. A professional Dolby Atmos immersive audio mix must be no louder than -18 LUFS. This standard is non-negotiable. It's in place due to the potential folding back to a stereo mix. A Dolby Atmos environment has a minimum of 12 speakers. It will be deafening if 12 speakers fold back to 2 speakers. Hence, the -18 LUFS. There is a second delivery standard of -1dB True Peak or lower. Not adhering to these standards can lead to a compromised audio experience. A mixing engineer who needs to learn about, understand, or meet these delivery standards is not a professional.
It's crucial to recognize these essential elements when hiring an immersive audio-mixing engineer. When shopping with price as the most important factor, some or all of these elements will be ignored. However, they cannot be overlooked. The adherence to these standards is a clear indicator of a professional and competent audio-mixing engineer.

Dolby Atmos Mixing Studio For Music At Starsound
Dolby Atmos Mixing For Music at Starsound Studios. Dolby Atmos Immersive Audio is a unique format allowing the listener to be immersed in audio. We have built a 9.1.4 Dolby Atmos system and are ready to mix your music like you have never dreamed of it sounding.
Dolby Atmos is a Dolby Laboratories audio technology that enables surround sound reproduction with height information. It first appeared in 2012 as Dolby Atmos Cinema, a movie theater format. In 2014, Dolby released the Dolby Atmos home theater system, which allows people to listen to movies and other content in Dolby Atmos on their home entertainment equipment.
Dolby Atmos Audio Mixing is becoming increasingly popular in recording studios, allowing sound engineers to create immersive soundscapes with greater control over the output. Dolby Atmos mixing requires a specialized console or software and involves creating multiple audio tracks that combine into a single Dolby Atmos mix. It also has a unique LUFS standard: -18 LUFS. This standard allows playback on any system without distortion.
The Render From Haverstick Designs

The Actual Build
Dolby Atmos And Music Production
Dolby Atmos Audio Mixing is especially beneficial for music productions featuring various sounds. Engineers can precisely adjust the directionality of each sound to create an immersive 3D experience. Additionally, Dolby Atmos mixes tend to have reduced artifacts compared to traditional stereo recordings, leading to improved clarity and dynamic range. The enhanced clarity and dynamic range are due to the unique -18 LUFS standard. Finally, Dolby Atmos mixes can be easily adapted for Dolby Atmos home theaters, opening up a world of possibilities for listeners to enjoy a more immersive audio experience.
Dolby Atmos Audio Mixing is an exciting tool for sound engineers and music producers looking to create a unique listening experience for their audience. Dolby Atmos Renderer is a software that not only enables the rendering of Dolby Atmos audio but also does so efficiently, saving valuable time and money. Dolby Atmos Renderer also allows sound engineers to produce Dolby Atmos mixes on the fly without any additional hardware. Dolby Atmos Renderer simplifies the process of creating Dolby Atmos Mixes and ensures an optimal audio experience for consumers. Dolby Atmos Audio Mixing is quickly becoming a must-have tool in any modern recording studio.
Dolby Atmos Immersive Audio At Starsound
At Starsound Studios, we have just installed a 9.1.4 Dolby Atmos Immersive Audio System. This system has nine speakers at head height around the listener and one subwoofer channel, which can contain many speakers if desired. The remaining four speakers are on trussing or poles above the listener near the ceiling.
The channels include a Left, Center, and Right front wall configuration. With the LCR is the subwoofer. The wide speakers are just to the left and right of the LCR. They are off the front wall on both sides of the listening position. Just behind the listening position are the mid-position speakers on either side of the listening position. There are two speakers behind the listening position: the rear speakers. Lastly are the height speakers. The positioning is two in front and two in the rear of the listener.
In conclusion, Dolby Atmos Audio Mixing provides an excellent way for sound engineers and music producers to create immersive 3D audio experiences with greater control over the output. Dolby Atmos mixing requires specialized Dolby equipment or software. It involves creating multiple audio tracks, which combine into a single Dolby Atmos mix. Utilizing the Dolby Atmos Renderer helps streamline the process of creating Dolby Atmos mixes and saves time and money in the studio. Speaker systems are around the listener in 7.1.4, 9.1.4, and 9.1.6, among others. With its unique capabilities, Dolby Atmos Audio Mixing is quickly becoming an essential tool for audio professionals.
Immersive Audio | Is Dolby Atmos The Future Of Audio Mixing?
As the world of audio mixing evolves, so does the technology that drives it. Immersive audio is the newest form of mixing, and Dolby Atmos is at the forefront of this cutting-edge technology.
But what is immersive audio, and how does it differ from traditional audio mixing? Immersive audio is not just a soundscape; it's an experience. It's a three-dimensional world that envelops the listener, making them feel as though they are inside the music. Dolby Atmos, a revolutionary new way of mixing audio, is the gateway to this captivating experience.
Traditional audio mixing relies on two-dimensional soundscapes to create a stereo image. While a two-dimensional soundscape can be compelling in some cases, it doesn't allow the listener to appreciate the music entirely. On the other hand, immersive audio creates a three-dimensional soundscape that allows the listener to feel as though they are inside the music.
Dolby Atmos is a technology that allows for immersive audio mixing. It uses a series of speakers to create a three-dimensional soundscape. Three dimensions enable the listener to feel like they are inside the music.
So, is Dolby Atmos the future of audio mixing? It's more than a possibility. It's a technology that holds immense promise. Immersive audio, still in its infancy, has the potential to not just revolutionize, but redefine the way we listen to music. And Dolby Atmos, with its immersive capabilities, could very well become the standard for audio mixing in the future.
Immersive Audio
So, what is immersive audio? It's not just another type of audio. It's a transformative experience that creates a three-dimensional soundscape, enveloping you in the music. It's a remarkably realistic and visceral journey that places you right in the heart of the action.
Dolby Atmos is not just a technology, it's a revolution in Immersive Audio mixing. It introduces a groundbreaking approach to sound design, empowering audio engineers to position sounds anywhere in the three-dimensional space around you. This unprecedented control over sound is a game-changer for filmmakers and game developers, inspiring new possibilities in their projects.
Dolby Atmos has already made its mark in some of the most significant movies and video games in recent years, such as Star Wars: The Last Jedi, Dunkirk, and Gears of War 4. This technology is not just a buzzword; it's a practical tool that is shaping the audio landscape and will continue to do so in the future.
Is Dolby Atmos the future of audio mixing? The signs are pointing in that direction. Immersive audio is an exciting new frontier, and Dolby Atmos is leading the charge. If you're keen on staying at the forefront of audio mixing, exploring Dolby Atmos is a must.
Dolby Atmos is the perfect tool for creating immersive audio mixes. The software allows you to place sounds anywhere in three-dimensional space, creating a realistic and enveloping experience.

Vocal Comping | Advantages Of Recording A Vocal Comp
Vocal comping, a meticulous recording technique, is a pivotal step in crafting the perfect vocal performance for your song. It involves recording multiple takes of the same lead vocal and then painstakingly compiling them into one final track.
Several advantages to vocal comping include:
Improved sound quality.
Greater control over the final performance.
More flexibility in editing and mixing.
ProTools offers a playlist selection on an audio track. If selected, it files each recording under the audio track you are recording on. You can start editing when finishing the same lead vocal track four or five times.
The vocal comping process involves a meticulous selection of the best small sections of the vocal. These sections are then 'flown up' to the main vocal track, one by one, from each vocal take. While it may be time-consuming, the end result is a final track that mirrors the professional vocals heard on radio songs.
Editing also consists of raising and lowering the volume of each take and fixing plosives. It is the first form of compression for the vocals to sound more consistent. Plosives are bursts of energy when singing the letter P or B. This burst of energy can overwhelm a microphone. You can make the P or B sound normal by selecting the small selection and lowering that burst of energy.
It is easier than ever to record a tremendous vocal comp that perfectly complements your song with professional-quality software and hardware tools. Whether you are an experienced artist or just starting, incorporating vocal comping into your workflow can help take your music to the next level. So, if you're looking to produce high-quality recordings with outstanding lead vocals, make sure to give vocal comping a try. Thanks for reading!
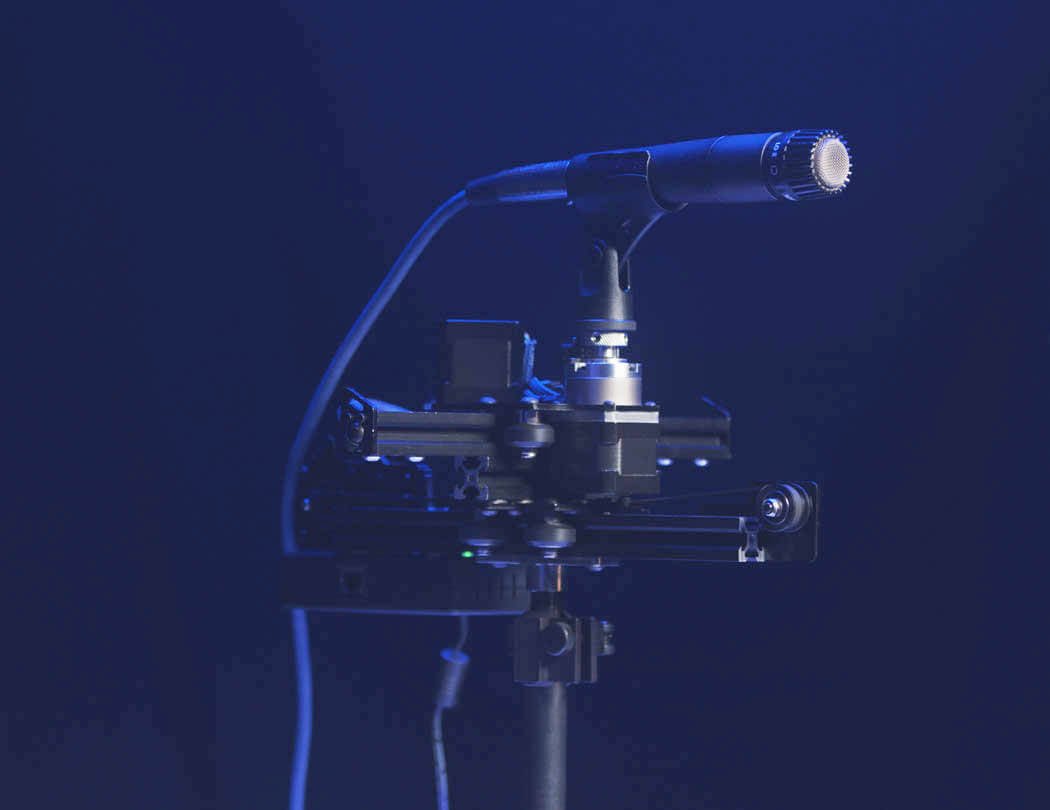
How To Record Guitar Using A Dynamount X2-R | Mic Placement
If you're in pursuit of that perfect guitar sound, the Dynamount X2-R is your secret weapon. This innovative device, used by professionals, will elevate your guitar recordings to a whole new level. In this blog post, we'll delve into the art of microphone placement, a crucial element in shaping your guitar's tone. Stay tuned for more invaluable recording tips from Starsound Studios!
When it comes to recording guitars, nothing is more crucial than microphone placement. With the Dynamount X2-R, you have the power to sit comfortably in your mix position and adjust the microphone's position on the cabinet in the other room, all through a simple Wi-Fi connection. This unique feature allows you to fine-tune your guitar's tone while the song is playing, effortlessly creating the album sound you desire without the need for extensive mixdown.
The Dynamount X2-R is a game-changer in guitar recording, offering unparalleled versatility in capturing different guitar tones. It can be moved from the speaker's middle to the speaker's outside edge, allowing you to experiment and capture every nuance of your guitar's sound. At Starsound Studios, we've developed a multi-step approach to harnessing this versatility for recording guitars:
Achieve the tone you want out of the amplifier in the room.
Set the headphone level you want to record with.
Use a meter to determine the incoming signal level. We consistently record at -18dB, which is analog 0 on a VU meter. Most interface settings follow this standard.
Sit in the sweet spot of your control room and evaluate the guitar tone from the near-field control room speakers.
Rest assured, the Dynamount X2-R is your key to achieving the perfect guitar tone. Use it to move the microphone along the guitar cabinet until you reach your desired tone. This tone will be the one you hear on your recording, ensuring your confidence in the final product.Use the EQ and compression on your guitar's channel to dial the guitar tone you wish to achieve further.
At this point, do a test recording with the rest of the band. Then, further evaluate the guitar tone. Make sure it does not interfere with other instrument tones in the song.
Adjust if necessary with the Dynamount X2-R and repeat the test recording. Do this step until you have the sound you want, individually and with the band.
A link to buy - https://dynamount.com/shop/x2-r/?af=starsound
So there you have it! If you want great guitar tones, experiment with different microphone placements to find what sounds best for your guitar recordings. Thanks for reading, and happy recording!
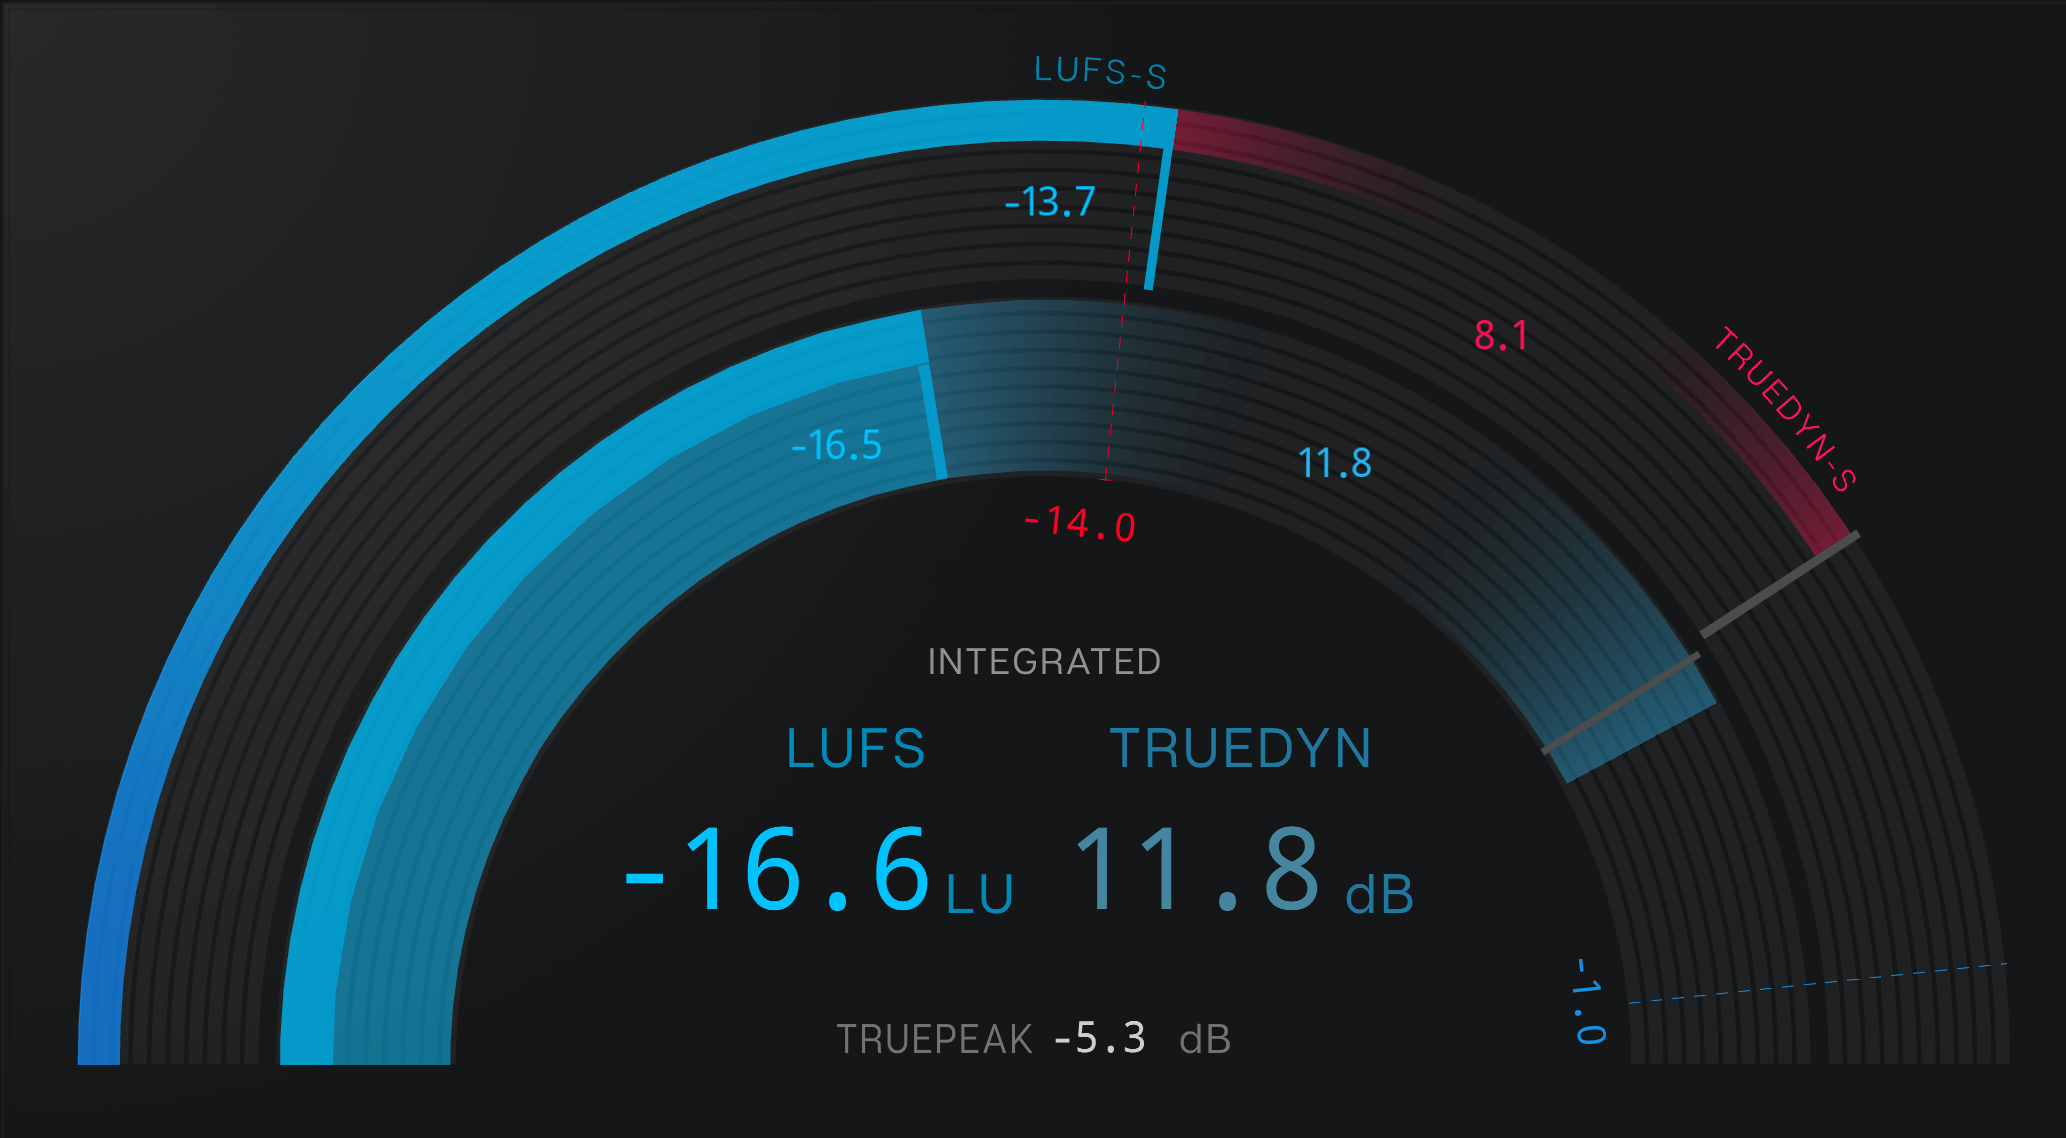
LUFS Social Media Platform Standards | Mastering Music
If you're a musician, you know that LUFS, or Loudness Units Full Scale, is a critical metric for measuring the loudness of your audio. LUFS is a standardized measurement of audio loudness, designed to enable normalization of audio levels on the platforms and your devices. But did you know that LUFS is also becoming increasingly important for social media platforms?
As digital consumption continues to rise, social media platforms are under increasing pressure to deliver consistent-quality audio to their users. This is why streaming platforms are now using LUFS to measure and normalize the loudness of audio content, making it a crucial aspect for musicians to understand and implement.
For musicians, understanding and adhering to LUFS standards is crucial. The loudness levels can significantly impact how listeners receive their music. If your music is too quiet on some platforms, it may not be easy to hear. Conversely, if your music is too loud, it may be disruptive or muted by the platform, potentially leading to a loss of audience engagement.

It is essential to know the LUFS standards used by popular platforms. Here are a few examples:
- Facebook: -16 LUFS (Loudness Units Full Scale)
- Instagram: -14 LUFS
- Snapchat: -13 LU
-YouTube: -13 LUFS
-Spotify & Tidal: -14 LUFS
-SoundCloud: -11 LUFS
-iTunes: -16 LUFS
Understanding LUFS standards empowers musicians, as it allows them to ensure their music meets specific requirements. This knowledge ensures their music is heard by a broader audience in the intended way, without the streaming service altering the music to fit their platform.
So, what exactly are these LUFS standards? And how can you make sure your music meets them?
LUFS (Loudness Units Full Scale) measures the loudness of audio. It's becoming increasingly important for social media platforms, as it allows them to normalize the loudness of audio content.
There are a few ways to measure LUFS, but the most common is using an Integrated Loudness measurement. Measuring the average loudness of your audio over time gives you a single number representing your track's overall loudness.
You can also measure LUFS with True Peak measurement, which measures the highest peak in your audio signal. The True Peak can help avoid clipping and distortion and ensure your music will sound its best.
What Is Vocal Comping? Recording Professional Vocals
"Vocal comping" refers to piecing together a finished vocal performance from multiple takes. It is a process. This can be done for several reasons, such as to fix pitch or timing issues or to create a more polished vocal sound by piecing together the best bits from multiple takes. It is the vocal sound that you hear on countless hit songs.
Comping vocals in the studio can be time-consuming, but getting an outstanding vocal performance is often worth it. Getting a hit song sound on your recording is almost impossible without doing one. We understand that time is money in the studio. However, this is the place to take extra time. Indeed professional vocals cannot be achieved any other way. Here are a few tips for vocal comping:
- First, record multiple takes of the vocal performance. Do at least four or five takes. This will give you more to work with when it comes to comping.
- Listen back to each take and make a note of the parts that sound best. Then, start piecing together a composite vocal performance from the best bits of each take.
- Pay attention to how the vocal sounds as a whole, not just individual words or phrases. The goal is to create a smooth, cohesive vocal performance.
- When putting together the final vocal track, start with the best sounding sections and build from there.
- Don't be afraid to cut out small sections of weak vocal performances - a little bit of editing can go a long way in making the final vocal track sound more polished.
- Once you're happy with the composite vocal performance, consolidate each piece together. Create fade points to the beginning and end of each section. This will be your finished vocal track.
Vocal comping is often done in music recording and production and film and television post-production. In music recording, vocal comping can help to ensure that the final vocal track is of the highest quality possible. In film and television, vocal comping can be used to fix dialogue recorded on-set but doesn't match up perfectly with the video footage.
No matter your reason for vocal comping, the process can be time-consuming but ultimately rewarding. With patience and attention to detail, you can create a final vocal track that sounds polished and professional. Vocal comping can be a helpful tool in achieving the perfect final product when recording vocals.
Hip Hop Rap Recording At Starsound Studios
Starsound Studios is offering a free Hip Hop - Rap music studio open house Saturday August 7th, 2021 and once a month after that.
Introducing the hip hop rap music open house at Starsound Studios. Come learn about recording hip hop music in a professional studio setting. Have your questions answered by a professional engineer and collaborate with other similar minded artists. Topics can include:
What is a vocal comp and why should I do it? Why would you use Waves Torque plugin? What LUFS standard goes with which social media platform and why is that important? I shouldn't use an MP-3? What is a reference track?
Come to our open house once a month on Saturdays from 1 to 3pm. Get free information, collaborate, network, and stop overpaying for your recording and getting very little in return.
JUNE 12TH, 2021
Starsound Studios is offering a free Hip-Hop—Rap recording—music studio open house on Saturday, August 7th, 2021, and once a month after that.
Starsound Studios is proud to introduce the hip-hop rap music open house. This unique event offers you the opportunity to learn about recording hip-hop music in a professional studio setting, directly from our experienced engineer. You can also have your questions answered by the professional and collaborate with other like-minded artists. Topics can include:
Why would you use the Waves Torque plugin? What LUFS standard goes with which social media platform, and why is that important? Shouldn't I use an MP-3? What is a reference track? What is a vocal comp, and why should I do it?
Professional recordings that you enjoy employ a method called a vocal COMP. A vocalist, or rapper, sings their lead part five separate times. Each time, they sing the entire song from beginning to end. Then, if a mistake occurs, keep going. The idea is to take the best pieces from each take to make a super vocal. Then, the audio engineer stitches it together from all the little bits from the five vocal takes. Punching in does not achieve that professional sound. If you intend to sound professional, employ their exact methods. At Starsound Studios, we record everyone the same. It does not matter if you are a star or just starting. Professional concepts are just that. We do not compromise on these principles and would instead refuse the job.
Don't miss out on our open house, held monthly on Saturdays from 1 to 3 pm. This is your opportunity to gain valuable insights, collaborate with fellow artists, and network with industry professionals. Stop overpaying for your recordings and getting very little in return. Instead, join us and discover a new level of quality and professionalism in your music.
How to Record Guitar With A Dynamount X2-R
How to record guitar. We will show you our step by step process of how to record guitar so that you can reproduce those steps at home. Or, you can let us handle the recording for you. Recording guitars start with dialing in the tone of the amplifier in the air. This process is individual to each guitarist. The idea is to get the sound they enjoy while standing in front of the amp and listening.
Once that is achieved, the second step of how to record guitar is getting the headphone mix right. This is an essential step because that is how a guitarist will monitor their playing. It is vital for that part to be done right as the recording will suffer otherwise.
The next component of how to record guitar is making sure that your console monitor speakers are in your mastering stage. All of the plugins and analog gear have to be engaged. If you dial a sound in without this step, engaging it later will alter what you have decided was a good guitar sound. This step is critical. Monitor with a limiter on. We send audio out to a summing box and to outboard gear. That signal chain must be active. It could be detrimental to your recording otherwise.
How to record guitar is the focus of our blog. We will show you our step-by-step process of how to record guitar so that you can reproduce those steps at home. Or, you can let us handle the recording for you. Recording guitars start with dialing in the amplifier's tone in the air. This process is individual to each guitarist. The idea is to get the sound they enjoy while standing in front of the amp and listening.
Once that is achieved, the second step of how to record guitar is getting the headphone mix right. Getting the headphone mix correct is essential because a guitarist will monitor their playing through them. Getting that step correct is vital as the recording will suffer otherwise.
The next component of how to record guitar is making sure that your console monitor speakers are in your mastering stage. All of the plugins and analog gear have to be engaged. If you dial a sound in without this step, engaging it later will alter what you have decided was a good guitar sound. This step is critical. Monitor with a limiter on and engaged on the track. We send audio out to a summing box and other analog outboard gear. That signal chain must be active and could be detrimental to your recording otherwise.
The next step is to get the guitar amp's sound out of your monitor speakers. Getting this sound is the most crucial step, and we use the Dynamount X1-R to achieve it. This step is the foundation of your album sound. Again, we use the Dynamount X1-R to accomplish this step. We sit in the mix triangle with the guitar player standing right behind us. The Dynamount X1-R is a wifi motorized microphone platform. We place it in front of the guitar cabinet, and it moves the microphone as the guitar player is performing in real-time. Pushing the mic toward the speaker's center will give you higher tones. Achieve lower tones by moving the microphone to the edge of the speaker. However, it does not stop there.
Each channel that we record has an analog equalizer and compressor. We use those on the way in to help shape the sound further. This step helps get the music we want out of the monitor speakers even more and helps with the next step we will discuss. We use these steps to record every instrument. Get the sound you want the final album to sound like from the beginning.
Finish these steps with every instrument record the band. Then, a funny thing will happen. Those sounds that you thought were fantastic guitar, bass, keyboard, and drums sounds do not work together. That is where the Dynamount X1-R comes into play again. We need to listen to how the guitar relates to the other guitars to record the guitar. Also, listen to how the bottom of the guitar relates to the bass guitar. If there is a problem with the sound, move the microphone accordingly. Too much interference with the low end of the guitar? Move the mic towards the middle of the speaker, likewise with the bass sound. Get the band to blend with itself. Nobody will have their exact instrument sound, but the sounds will work together for the entire group. That is the ultimate goal. Visit Starsound Studios for more information.
Recording Acoustic Guitars At Starsound Studios
How To Record Acoustic Guitars? If you are not going direct, it is all about mic placement. Place the microphone too close to the soundhole, and you will get more body because of the proximity effect. Set the mic closer to the neck, and you will get more sparkle. You will get more direct acoustic guitar sound and less room the closer the microphone gets to the acoustic guitar. You will get more room sound farther away. What do you do?
How To Record Acoustic Guitars? In comes the Dynamount X1-R. It will allow you to move the microphone along the sound source in real-time while you are in the sweet spot listening to the result. As soon as you find the perfect place, you can save it as a preset and keep experimenting. It is an ideal tool for capturing excellent sound and lets you get the best mic positions.
How to Record Acoustic Guitars? If you're not going direct, the world of mic placement is your oyster. Place the microphone too close to the soundhole, and you'll get a rich, full-bodied sound thanks to the proximity effect. Move the mic closer to the neck, and you'll capture the guitar's sparkling highs. The closer the microphone gets to the acoustic guitar, the more direct the sound and the less room it will have. Move it farther away, and you'll start to capture the unique room sound. The possibilities are endless, what will you discover?
How To Record Acoustic Guitars? In comes the Dynamount X1-R, a versatile tool designed specifically for mic placement in real-time recording. It will allow you to move the microphone along the sound source in real time while you are in the sweet spot listening to the result. You can save it as a preset and keep experimenting when you find the perfect place. It is ideal for capturing excellent sound and lets you get the best mic positions.
Typically, the microphone is positioned at the twelfth fret to capture the strings and the sound hole for the body sound of the acoustic guitar. The Dynamount, however, offers a unique advantage. Placing it at the twelfth fret and then angling the microphone off-axis towards the sound hole provides a versatile recording solution. This setup allows you to capture the best of both worlds. The Dynamount can also be used to adjust the distance from the acoustic guitar. By moving it back and forth, you can observe how the air space between the guitar and the microphone creates a form of compression. Similarly, moving the Dynamount from side to side can be used as a form of EQ. The best part? These adjustments can be made without the need for additional plugins.
When it comes to recording acoustic guitar in our vocal booth, I usually wait until after the band has finished their recording. In the audition phase, I use the Dynamount as a form of EQ and compression. It's not just a tool, it's a mechanical equalizer and compressor. I move the microphone around the acoustic guitar in real time to determine its sound against the rest of the track without the use of compression or EQ. This process, with the Dynamount at its core, ensures that I'm making informed decisions about the sound of the acoustic guitar.
How to Record Bass Guitar In Cleveland At Starsound
How to record bass guitar you ask? Microphone placement is key. We use a Dynamount to robotically move a microphone along the bass cabinet in real time. This enables us to sit in the sweet spot of the speakers and listen to the bass tone while the microphone is moving across the cabinet. Stop when you find the tone you need.
This blog will focus on how to record bass guitar. We will show you our step-by-step process of how to record bass guitar so that you can reproduce those steps at home. Or, you can let us handle the recording for you. Recording bass starts with dialing in the amplifier's tone in the air. This process is individual to each bass guitarist. The idea is to get the sound they enjoy while standing in front of the amp and listening.
Once that is achieved, the second step of how to record bass guitar is getting the headphone mix right. Achieving the right headphone mix is essential because a bass guitarist will monitor their playing through them. Therefore, doing that part is vital as the recording will suffer otherwise.
The next component of how to record bass guitar is making sure that your console monitor speakers are in your mastering stage. All of the plugins and analog gear have to be engaged. If you dial a sound in without this step, engaging it later will alter what you have decided was a good bass sound. This step is critical. Monitor with a limiter on and engaged on the channel. We send audio out to a summing box and outboard gear. That signal chain must be active, which could be detrimental to your recording otherwise.
The next step is to get the sound of the bass amp out of your monitor speakers. Getting the bass sound out of the monitors is the most crucial step, and we use the Dynamount X1-R to achieve it. This step is the foundation of your album sound. Again, we use the Dynamount X1-R to accomplish this step. We sit in the mix triangle with the bass player standing right behind us. The Dynamount X1-R is a wifi motorized microphone platform. We place it in front of the bass cabinet, and it moves the microphone as the bass player is performing in real-time. Pushing the mic toward the speaker's center will give you higher tones. Achieve lower tones by moving the microphone to the edge of the speaker. However, it does not stop there.
Each channel that we record has an analog equalizer and compressor. We use those on the way in to help shape the sound further. Using the analog gear helps get the music we want out of the monitor speakers even more. It also helps with the next step we will discuss. We use these steps to record every instrument. Get the sound you want the final album to sound like from the beginning.
After taking these steps, with every instrument, record the band. A funny thing will happen. Those sounds that you thought were fantastic guitar, bass, keyboard, and drums sounds do not work together. That is where the Dynamount X1-R comes into play again. To record the bass guitar, we need to listen to how the bass guitar relates to the kick. Also, how it relates to the bottom of the guitar parts. If there is a problem with the sound, move the microphone accordingly. Too much interference with the low end of the kick? Move the mic towards the middle of the speaker, likewise with the guitar sound. Get the band to blend with itself. Nobody will have their exact instrument sound, but the sounds will work together for the entire group. That is the ultimate goal. Visit Starsound Studios for more information.
Audio Mixing In Cleveland Ohio At Starsound
Audio mixing services from Starsound Studios provide you with the utmost quality and care. We take your audio files and provide you with the best audio mixing services. It does not matter if you are actually in Cleveland, Ohio, or another state. For that matter, audio services Cleve. OH can mix stems you send us from anywhere in the world.
We are using our flagship Studio A, Audio mixing services Cleve. Ohio will provide the highest quality. It provides an analog-digital hybrid system that adds analog weight to your song. Also, it means that we are retaining all of the advantages and ease of use that digital audio products provide. It is truly the best of both worlds.
We will be sending the audio back to you via google drive. Audio mixing services Cleve. OH sends an invitation to download your WAV, MP-3, or both. You will have a professional-sounding mix of industry-standard delivery. An expert mix will stand up to the recordings that you hear on the radio. Get a competitive radio mix done correctly here at Starsound Studios for a fair price. Also, getting one of our many other services to help promote your project and get found on the internet is even better.
I adhere to the LUFS standard needed to make your mix radio-ready. I also use Izotope’s Tonal Balance. This plugin will show you the EQ curves of multiple genres of music. I then run your mix through its plugin to determine if the song I am mixing fits their EQ curve. When I achieve the LUFS standard and the song lands inside the EQ curve set by the genre of music, your song will stand up to the radio music you like. To make the song loud, we use Nova Clip. It lops off the top transient to achieve a louder result. These steps ensure that our mixes stand up against the chart-topping hits.

Recording Drums Cleveland Ohio At Starsound
Recording Drums Cleveland, Ohio. We have developed a system to help us record drums. There are several steps to get a great drum sound. We will walk you through it step by step so that you can try and recreate it at home. Or come to Starsound, where we have your back.
First, when recording drums Cleveland, Ohio, you have to tune all of your drums to a specific tension. It needs to be the same for each drum. The same pressure means you are letting the drum body itself determine the sound. We tune our drums to 70psi for every lug, and the result is 75 in the middle of the head when finished. Crossing the lugs the same way you tighten your tire on to the car is the key. Do this the same for the top head and bottom head of your drums.
Secondly, put a few cotton balls into each drum. This should be done before you tighten the head down. The purpose of the cotton is to deaden the decay of the drum. Soon as you hit the batter head, the cotton balls fly into the air and land back down on the resonant head. The cotton balls hitting the resonant head reduces the amount of ring the drum produces. This is great for a recording. It means less editing when a drum quickly decays.
When recording drums, we adjust the level of the drum microphones by turning up or down the preamp. The preamp flows into ProTools through its converters, which are set to -18dB. That level is where the converters are aligned to analog zero. This way, our gain staging is set to hit analog gear immediately. We put a plugin with a meter inside and set that level accordingly. This is a big step when using any outboard analog gear. You will want to check your interface to see what it is aligned to and use that number from the user manual.
Next, have the band play together when recording drums Cleveland, Ohio. Listen to the bass guitar and kick drum relationship. Make sure there is no masking of frequencies. If the kick is the lowest element in the song, adjust the bass guitar sound by applying a high pass filter to the desired equalizer frequency. Reverse that process if the bass is carrying the bottom of the song. When you are confident that the drums sit well with the rest of the music, you are ready to go. Until next time!
Recording Guitar Dynamount At Starsound Studios
We have been developing a five-step approach when recording guitars with Dynamount to get a great tone in a recording. The secret is to capture your guitar tone out of your monitor speakers. The only way to accomplish this is with a Dynamount. It allows you to move the microphone along the guitar cabinet in real-time while sitting in the sweet spot between your monitor speakers. Here are the five steps.
First, get the guitar sound that you or your client wants in the room. In our video, recording guitars with a Dynamount below, the guitarist had a foot pedal that they wanted to use. We integrate it into our process quickly and easily. He continues to play until we dial in the sound he likes to hear in the air. We constantly fiddle with the pedal and controls on the amp to taste. This process takes time and effort. That is step one.
Secondly, we get a headphone experience that the guitarist likes when recording guitars with a Dynamount. This step is tricky because guitarists do not spend a ton of time listening to their guitar through headphones. Usually, it is a four twelve cabinet on stun! Moving to headphones is a different experience. We have a multiple-channel headphone rig with equalizers onboard to combat this issue. Tweak this system until they are at least a little more comfortable. That is step two.
Thirdly, we use a meter to ensure the proper signal level coming into our converters. Since the converters that we use calibrate to -18dB, we ensure the meter sets to this level. We achieve this by using the seven-band EQ that comes standard with ProTools. It occupies the first plugin spot. While it is open, have the guitarist play and watch the meter. There is a line that is -16dB within the plugin. Use that level to set your incoming signal. The converter can handle a couple of dB tolerance. Turn up or down your preamp level until you achieve this level. This step is the most important. You cannot clip the converter. Take great care in this step. That completes step three.
Next, we dial in the sound with a Dynamount. We have three for both our guitar rigs and the bass rig. Once the Dynamount calibrates itself, move the microphone along the speaker cabinet until you achieve the album sound you are looking to meet. This process is painstaking. All of this takes time, energy, and patience. It is also why we have a ten-hour minimum in all of our studios. This step is the most important one, as it is your final guitar tone to be recorded.
Finally, record the take. Make sure that the playing is consistent and on timing when recording guitars with a Dynamount. Get the audio take as close to perfect as you can. Re-record over and over if necessary. The idea of fixing mistakes in the mix is a myth. You only make it less miserable. If there is something you are not happy with, always re-record. Editing takes much longer than a retake. Visit Starsound Studios for more information. Until next time!
Recording Bass Guitar At Starsound Studios
Recording bass guitar at Starsound Studios is a process. We use a four-step method when recording bass guitar.
First, the player must be comfortable with their sound. So we dial in the music coming to their headphones. The Behringer personal headphone mixer allows us to bring 16 channels, so mixing is a breeze. Choose the mixing board channel, turn it up or down, and proceed in that fashion until you get what you need to lay down a good take.
The second step to recording bass guitar is making sure the incoming signal into our DAW is in the sweet spot of the A/D converters. Insert a seven-band EQ on each bass channel and check the meter within the EQ to make sure it reads -16Db. Our ProTools converters align to -18Db. But they are tolerant by a few Db. The EQ provides a meter with a -16 setting, perfect for this step. Once the incoming signal is where we like it, the EQ is no longer needed.
The third step in recording bass guitar is using the Dynamount Remote Microphone Mount to dial in the amplifier sound coming out of the monitor speakers. Move it toward the cone to get a higher frequency response. Move it toward the outside edge of the speaker for a lower tone. We also have a stationary microphone on the tweeter of the bass cabinet to catch the snap of the strings. The blend between the two will end up being the bass sound.
Finally, the band will record together. Have the band record only a portion like a verse, middle, and chorus. Listen to the recording to evaluate where the problems lie. For example, with recording bass guitar, the problem lies in the relationship with the kick drum. Once you choose which one you want to be at the very bottom of the song, go back to step three and tweak the setting on the Dynamount. This procedure will either raise the EQ of the bass or lower it, depending upon your preference. Now re-record the same verse, middle, chorus to see if that fixes the problems. If it does, you are ready to record for real. If not, go back to step three. Keep working on the sound before recording it for real.
Here are our final thoughts when recording bass guitar in the studio. Step three is enormous. You will repeat that step multiple times. What you want is a finalized record sound before laying a track down. Taking the most care during this step is critical. There is no such thing as fixing it in the mix. You only make it less miserable. Until next time!
Recording Hip Hop Rap Music At Starsound Studios
Recording Hip Hop - Rap Music Cleveland, Ohio, is a blog post on how to prepare for a recording session. Every artist that inquires about our studio wants only a few hours of recording time and brings an MP-3 to record to. This is a huge mistake. An experienced engineer needs at least 3 to 4 hours to mix and master a song that you can compare to your favorite radio artist.
So if you ask for two hours, that isn’t enough time for the engineer, let alone actually recording your parts. Also, an MP-3 is the worst quality audio there is. An algorithm reduces the WAV file by more than half. You really don’t want to record over that. Your vocal frequency was not a consideration when making the song. That is a huge downfall. It is a generic beat that the people who make beats are hoping to sell. You like it. Now you pick the WAV or god forbid, the MP-3. Changing the song is impossible.
Recording Hip Hop - Rap Music Cleveland, Ohio, is here to the rescue! Always pick the track out. I know it is more expensive, but it will be worth it to you in the long run. Remember, the song was not mixed with you in mind. Now that you have the track out – it can be. Now you can have a custom mixed song with your vocals in mind. Nothing in the way of your voice. That cannot be accomplished with a WAV or MP-3.
Recording Hip Hop - Rap Music Cleveland, Ohio is a blog post from Starsound Studios. We know what to do to help you achieve the sound you are looking for. Give us a call, and we will deliver the sound quality you desire. Book your Hip Hop - Rap Music Cleveland Ohio time today.
Recording Studio Near Me: Cleveland, Ohio
Recording Studio Near Me is a search term used when searching for a recording studio, but what studio will be the right choice for you? Of course, that is the million-dollar question. We will guide you on choosing the proper studio for you when searching for a recording studio near you.
First, you must find the right audio engineer to give you what you are looking for how your song will sound. Then, ask for a tour and to hear examples of their work. You may not like the songs they play. That does not matter. Listen to the mix itself. Does it have all of the nuances of how you want your project to sound? If the answer is yes, that's the studio for you.
How comfortable is the studio?
Every recording studio provides water, bathrooms, couches, a break room, and the like, but how satisfied are you with the knowledge and expertise of the sound engineer? Is the studio environment inviting, and how about the layout? Can you see yourself recording in that environment? If the answer is yes, it's probably the studio for you. Is there a clear mutual vision of how to capture your project? A recording is not a spur-of-the-moment activity, and it takes planning and effort to complete. Does the audio engineer provide a clear vision and ask you questions to mark that path? If the answer is yes, it's probably the studio for you.
How Much Does it Cost?
Lastly, did you notice that I did not talk about cost? It does not matter how much it costs if you have found the proper studio to execute your vision. If you go to the cheapest studio and fail to get the result, what is the point in that? So the next time you type in the search "recording studio near me," remember these few points and see how the person on the other line handles the conversation. It will honestly speak volumes.
By the way, the "Recording studio near me" search term only shows you who is closest to your phone or home computer, and it doesn't mean they have the right plan for you and your project. Until next time!

Communication: Prepare For A Recording Session | Studio 101
Communication between a recording studio and its clients is vital. Discussing everything about the project before the recording starts is paramount. We put together this series to help the recording session run as smoothly as possible. Each of our videos fits together and overlap. Communication is the glue that brings all of these suggestions together. A Client's understanding of the recording process and why a studio engineer is making suggestions is essential. A studio engineer needs guidance from the client to help get the entire process finished on time. Also, they need that guidance to give you what you came to the studio for in the first place. A discussion over this whole process is the communication we are referring to.

Communication starts with how long it will take and how much it will cost for that time. We feel ten hours a song is what it should take. It takes into account several things. The first is a two-hour setup time that includes every instrument's microphone level settings on the pre-amps. It is also taking into account the converters of the interface. Listening to every instrument part playing together as a group is very important. Sometimes there is a masking of frequencies between musical instruments. Keep in mind that there is no such thing as fixing it in the mix. Recording correctly needs to be done from the very beginning. Taking this step ensures the song will come out the way it should.
Secondly is the time it takes to mix and master a song. This step depends upon the individual audio engineer. I average three to four hours when mixing and mastering songs. Mixing depends upon the original recording. So if taking care at that point, mixing and mastering can be less of a mess.
What Else Is Involved With Communication?
Communication with the studio is also about how much editing you require. We suggest playing to a click track. Playing to a click track means there will be less editing. On average, spending two hours on editing is standard. Editing is more for songs that artists send to me to mix and master.
The third step is recording the group. This step is the least predictable time frame. How much preparation a client does before coming to the studio is unknown. The fact that we are doing this series will tell you that there is a need for preparing. Our intention is not to be disrespectful. How can you know what you don't know? That is why we are doing this series. Helping someone when entering any recording environment, home, or commercial is enormous. Three hours is the average here in our studios.
The communication between the studio and their clients will reveal every aspect of how long it will take to get your project done. That can be a moving target, which also needs discussion. Nothing ever runs entirely the way the planning happens. However, if a plan takes place, there will be an understanding of if hang-ups may happen. In my estimation, it will take ten hours per song. Some have gone quicker and others longer. The average has been ten hours. That is why we have a ten-hour minimum in our studios.
Communication is key. Do not be afraid of asking questions and getting clarification. If a studio has an issue with that, move on to a different one. Better yet, give us a call. Communication is standard practice here.

Have Examples: Prepare For A Recording Session | Studio 101
Have examples. I know you are an original band. However, you have influences and bands you respect and want to emulate their sound. Your original material makes it different. But you can go after a tone or feel of a group you like. For example, let's say you are a metal band. You sound nothing like Metallica. However, you want the power and tone of the song Enter Sandman. Your song is nothing like it, but you respect the sound. So how do you do that? We are happy you asked.
Have examples and bring them to the initial meeting with your studio or the first session. Have the engineer listen to the song. This way, as you are getting set up and setting sounds, the engineer can follow the example. The engineer can pay attention to the tone and help you tweak your sounds to capture the sound of the band you are trying to emulate on the CD example.
I Have Examples - So How Does That Help?
ProTools, as well as most DAW's, have an input monitor button. The button allows you to listen to what is coming into ProTools. Put the example you brought to the studio on the master track. Now you can toggle the button on and off. When the switch is on, you are listening to the band. When it is off, you hear the example. The songs are different, but you can achieve the same tone and power.
If you have examples, you help the engineer accomplish what you want from the recording. If you come in saying make it browner, that statement is up for interpretation. Also, that would be a very long conversation. If you have examples, the dialogue and outcome are entirely different and very much so for the better.
Practice Correctly | Prepare For A Recording | Studio 101
Practice Correctly? What do you mean? We have done several video tutorials and blog posts on this topic and plan future ones. One way to practice correctly is to practice in the environment you are entering. Do you know those Iron Man competitions where the athletes swim five miles, bike ten, and run a marathon? They have to swim in the ocean for five miles. You would not practice in a flat, calm pool heated like bathwater. The environment that you are entering is cold and wavy. Same with entering a recording studio. If you are recording with headphones, practice with headphones. Get used to how they sound. Get comfortable with them on your head for long periods.
Another way to practice correctly is by using a click track or metronome. Using a click track will keep the group tight and your recording tighter. Thirdly would be to record yourself at home. Listen to how you sound. That sound won't change because you are at a recording studio. Keep adjusting yourself at home to blend the music of your group. When you enter a recording studio, you already have a good idea of how it will sound, not just hoping it will.
What Do I Do Now to Practice Correctly?
Lastly, I equate practice correctly to a hitter in baseball. You go to the batting cage an hour a day, seven days a week, and have a hitch in your swing. Then you keep practicing with that hitch, not realizing it, and are practicing the wrong way. Now you get in a game and wonder why you still don't make contact with the ball repeating over and over that you are practicing every day. If you practice wrong, it won't translate to the field. Same with entering a recording studio. You certainly do not want to practice the wrong way and play with a hitch in your instrument.
It would be best to listen to your recordings at home for consistent playing, timing, and dynamics. If you're playing is all over the road, the sound of your studio record follows suit. Practicing is not just time spent noodling your favorite tune; it is playing and dissecting the performance, repeating the right things, and eliminating mistakes. Your recording will thank you.